Thanksgiving is coming, and we are providing 50% off promotion for CrossFTP Pro's license. The promotion is available from now to the end of Nov. Get a license for CrossFTP now at our buy page and enjoy it!
Thanks for using our product. Let us know if you have any suggestions or comments.
Sunday, November 22, 2009
Tuesday, November 17, 2009
How to Synchronzie Folders in CrossFTP
Synchronization and Backup are two common tasks for FTP and cloud storage users. You are allowed to do synchronization and backups for any two folders on Amazon S3, WebDav, FTP, iDisk, or your own computer in CrossFTP Pro. To do the synchronization, simply choose Tools -> Synchronize Directories... The synchronization dialog will be displayed as follows:

The left and right top edit box shows the two folders you are trying to synchronize on. A number of options are provided in this Synchronization Dialog.
Filters options help you to refine the synchronization results by a number of directions and criteria. Only filtered results will be appeared in the final synchronization process.
These buttons help you to add the previewed sync content to the queue, or save the current synchronization tasks in the queue.
You can schedule all the tasks in the queue. Since you can queue the synchronization task in the queue (use Queue Settings button), you can simply schedule the queued sync item (Queue -> Advanced -> Schedule...), or save this queue for future usage (Queue -> Manage Queue -> Save Queue...).
Example
Here we will show an example for you to understand our synchronization/backup process. If you want to backup local machine's forum => remote Amazon S3's forumOld, you can go to local machine's folder in the left pane, remote Amazon S3's folder in the right pane, and choose Tools -> Synchronize Directories... After that, left (source) and right (target) folder's edit box will be automatically filled in with the folders mentioned before. After that, you should choose "include sub directories" and "Mirror Left to Right" options, and then press Preview button. All the results will be displayed in the table below after calculation is made. Finally you can press Synchronize button to add the Sync results in the queue, or if you are satisfied with the setting, use Queue Settings button to store this sync dialog's setting in the queue, so that you can schedule/edit this setting in future. You can also check this link for a screencast.


What to Sync
Describe the content that will be synchronized/backup.- Include, exclude - the patterns for you to include or exclude in the synchronization. It is a comma-separated list of patterns of files that must be included/excluded. When both inclusion and exclusion are used, only files/directories that match at least one of the include patterns and don't match any of the exclude patterns are used. If no include pattern is given, all files are assumed to match the include pattern (with the possible exception of the default excludes). The default excludes are empty in CrossFTP. The definition of the patterns can be found here.
- Include Sub Directories - whether sub directories should be included for the synchronization.
- Follow Symbolic Link - whether the symbolic link should be followed or just treated as a normal file. If symbolic link needs to be followed, linked file/directory will be retrieved.
How to Sync
Describe the way how the comparison should be made for two directories' synchronization.- Mirror Left to Right - Treat the Left side directory as the basis, and copy every files from left to right. If a file with the same name appeared simultaneously on the left and right, and two files are checked as different, the right side file will be overwritten. If a file appears only on right, you can choose to keep it, or by choosing "Delete Unnecessary Files" to delete it.
- Ignore Date - If it is checked, CrossFTP does not compare the file's last modified date, and treat them as the same if they have the same size. If it is not checked, two files with same size are treated as different if they have the last modified date differ larger than a given threshold. If your server has a different time zone with your client machine, you can setup the difference between your server and your machine at Site Manger -> Actions.
- Delete Unnecesary Files - In the Mirror Left to Right mode, if a file appears only on right, the right side file will be overwrited if this option is selected. Otherwise, no action will be performed on the right side file.
- Case Sensitive - whether the file name's comparison are case sensitive.
- Preview - Preview the synchronization result. It will retrieve all the matching files from the synchronization directories, compare the files, and then list the comparison result on the synchronization table below.
- Stop - Stop the Preview.
- Help - Get help information of synchronization.
Filters options help you to refine the synchronization results by a number of directions and criteria. Only filtered results will be appeared in the final synchronization process.
- Right Direction - Keep or filter all the items that need to copy towards right side.
- Left Direction - Keep or filter all the items that need to copy towards left side.
- Equal - Keep or filter all the items that left and right sides are treated as equal.
- Unequal - Keep or filter all the items that left and right side are treated as unequal.
- Last Modified in - You can define the number and interval (days, hours, minutes) that the file's last modified time should be within. If selected, only items that meets the last modified condition are appeared in the result set.
These buttons help you to add the previewed sync content to the queue, or save the current synchronization tasks in the queue.
- Synchronize - Put the previewed result set in the queue and close the synchornization dialog.
- Queue Settings - Save the what, how, and filters setting in the queue as one queued synchronization item. You can start the queue to process this synchroniztion item by the queue processing engine, shedule this sycn item for future processing, save/load this queue, or modified the sycn item in the synchorniztion dialog. After press this button, the synchornization item will be added in the current queue. If you edit a sycnchronization item in the queue, this Synchronization Dialog will be displayed for modification, and this button's text will be shown as Save.
- Close - Close the synchronization dialog and do nothing.
You can schedule all the tasks in the queue. Since you can queue the synchronization task in the queue (use Queue Settings button), you can simply schedule the queued sync item (Queue -> Advanced -> Schedule...), or save this queue for future usage (Queue -> Manage Queue -> Save Queue...).
Example
Here we will show an example for you to understand our synchronization/backup process. If you want to backup local machine's forum => remote Amazon S3's forumOld, you can go to local machine's folder in the left pane, remote Amazon S3's folder in the right pane, and choose Tools -> Synchronize Directories... After that, left (source) and right (target) folder's edit box will be automatically filled in with the folders mentioned before. After that, you should choose "include sub directories" and "Mirror Left to Right" options, and then press Preview button. All the results will be displayed in the table below after calculation is made. Finally you can press Synchronize button to add the Sync results in the queue, or if you are satisfied with the setting, use Queue Settings button to store this sync dialog's setting in the queue, so that you can schedule/edit this setting in future. You can also check this link for a screencast.

Conclusion
With the powerful synchronization and backup engine provided in CrossFTP Pro, it is a nice synchronization tool available for your FTP, FXP, WebDav, iDisk, and Amazon S3. Meanwhile it works well on Windows, Mac, and Linux. We hope you will find our post useful and enjoy the easiness of CrossFTP Pro. As always we appreciate your feedback as it helps to make the product better!Tuesday, November 10, 2009
How to use CrossFTP as an Excellent WebDAV Client?
WebDav is a collaborative file management protocol being widely used in a lot of cloud storage and content management systems, such as SharePoint, Alfresco, etc. It extends the HTTP protocol to make the Web a readable and writable medium, and it has much better firewall/router compatibility than the traditional FTP protocols. CrossFTP Pro is an excellent WebDav client with excellent reliability and performance, and it offers a lot of value-added services than the operating system's bulid-in clients.
In the following we will show how to connect to the WebDav site in CrossFTP, and some unique features available in the CrossFTP.
To get a WebDav account:
- Normally your WebDav service provider will give you the account information.
- If you have not got a WebDav account yet, you may register a traditional host provider (such as bluehost), or you can create a WebDav server on your own machine (such as Apache HTTP server with WebDav mod).
- After successful registration/creation of your WebDav account, you will get your WebDav server's host, port, user name, and password.
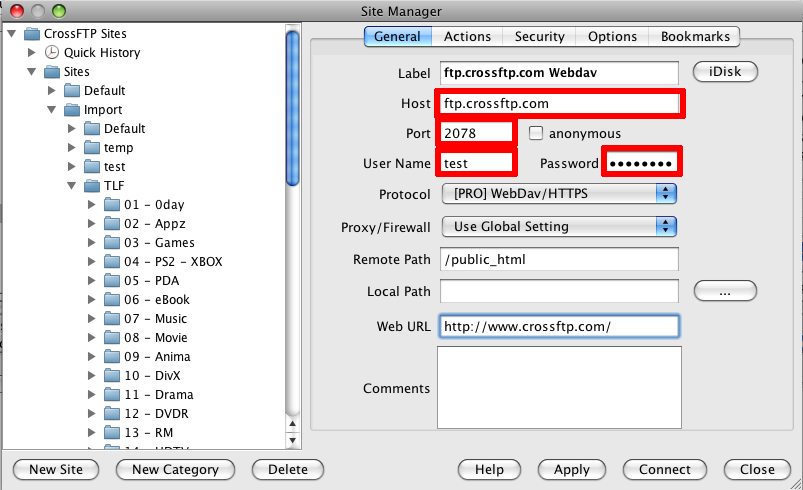
- Create a new site in CrossFTP, and choose the Protocol field as WebDav (default port is 80) or WebDav/HTTPS (default port is 443). After that, fill in the Host filed with your server's host, and Port field with your server's port.
- Enter your User Name field with user name, and Password field with password information, and press Connect to connect to the FTP Server.
- Setup your site's web URL (optional). If you want to preview your web pages, or copy the page's URL address, you can fill in the Remote Path field with your site page files' root path on your server (e.g., /public_html), and the Web URL field with your site's root URL (e.g., http://www.crossftp.com/). After that, you will be able to copy the page's URL, or preview the pages in your favorite web browser.
WebDav's Value-Added Services available in CrossFTP
- Lock and Unlock - Used to put or remove a lock on the resource. WebDav server normally supports both shared and exclusive locks. You can choose the Lock, Unlock, or Show Locks in the CrossFTP Pro file panel's context menu.
- WebDav FXP Copy - To copy directly on WebDav server without going through local computer, you can open the source and target WebDav locations on left and right panels, and do the copy. Your server needs to support WebDav copy API to allow this to work.
- Schedule the Queued Item - Batch transfer your data in the queue, and schedule the transfer task. You can choose the schedule option in the Queue's context menu -> Advanced -> Schedule.
- Synchronization - Synchronize the folders for your WebDav servers. You can choose it at Tools -> Synchronize Directories...
- Remote Edit - Edit your remote WebDav files directly.
- and much more, such as WebDav-to-WebDav copy, move to, rename, certification management, and more..
Conclusion
With the reliability and performance provided in CrossFTP, it is recognized as the top WebDav client tool available on the market. In addition, CrossFTP also supports the SFTP, FXP, and Amazon S3 protocols, and it works well on Windows, Mac, and Linux. We hope you will find our post useful and enjoy the easiness of CrossFTP. As always we appreciate your feedback as it helps to make the product better!--
CrossFTP is a FTP, SFTP, FXP, WebDav, Amazon S3, Amazon Glacier and Google Cloud Storage client for Windows, Mac, and Linux.
CrossFTP Team
http://www.crossftp.com/
Tuesday, November 03, 2009
How to setup custom metadata or http headers for Amazon S3 objects in CrossFTP?
If you are using Amazon S3 to serve your files over http, you will get an additional flexibility to custom http headers could provide. For instance if you properly set Cache-Control http header, it will help you to reduce your Amazon S3 bills.
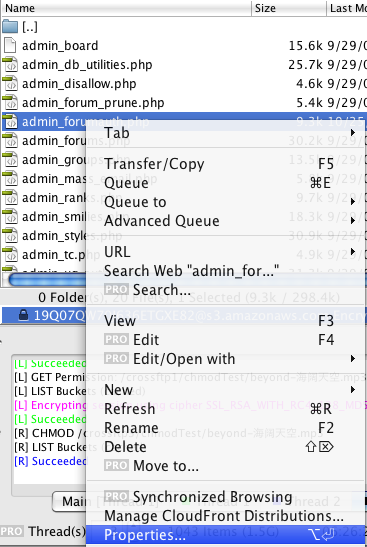
You can set up http-headers for the files already located in S3 buckets. Just select the file you want to set headers for and right click it. Choose Properties... from the context menu, and you will see the Metadata table in the Advanced tab.
The content of the metadata Table shows the headers metadata that are already assigned to the file. Most of them are assigned by Amazon S3 by default.

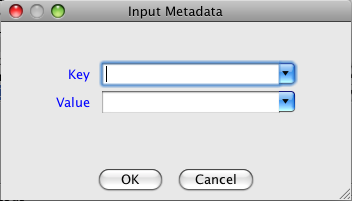
If you want to add a custom http header metadata, just click + button and type a name/value pair for the header.
Can I set headers for multiple files at once?
Yes. Just multi-select the files that you want to set headers for and follow the instructions above. If you want to apply for the subfolders as well, toggle the option "Apply changes to subfolders".
Commonly Used HTTP Headers for Cache:
- Expires:
      Key: "Expires"
      Value: HTTP-date
An example of its use is Expires: Thu, 01 Dec 1994 16:00:00 GMT
Note: if a response includes a Cache-Control field with the max-
      age directive (see section 14.9.3), that directive overrides the
      Expires field.
- Cache-Control:
    Key: "Cache-Control"
    Value: cache-directive
cache-directive = cache-request-directive
         | cache-response-directive
cache-request-directive =
           "no-cache"                          ; Section 14.9.1
         | "no-store"                          ; Section 14.9.2
         | "max-age" "=" delta-seconds         ; Section 14.9.3, 14.9.4
         | "max-stale" [ "=" delta-seconds ]   ; Section 14.9.3
         | "min-fresh" "=" delta-seconds       ; Section 14.9.3
         | "no-transform"                      ; Section 14.9.5
         | "only-if-cached"                    ; Section 14.9.4
         | cache-extension                     ; Section 14.9.6
cache-response-directive =
           "public"                               ; Section 14.9.1
         | "private" [ "=" <"> 1#field-name <"> ] ; Section 14.9.1
         | "no-cache" [ "=" <"> 1#field-name <"> ]; Section 14.9.1
         | "no-store"                             ; Section 14.9.2
         | "no-transform"                         ; Section 14.9.5
         | "must-revalidate"                      ; Section 14.9.4
         | "proxy-revalidate"                     ; Section 14.9.4
         | "max-age" "=" delta-seconds            ; Section 14.9.3
         | "s-maxage" "=" delta-seconds           ; Section 14.9.3
         | cache-extension                        ; Section 14.9.6
cache-extension = token [ "=" ( token | quoted-string ) ]
Conclusion
With the ability to set custom http headers CrossFTP Pro is becoming a compelling tool for Amazon S3 users, in particular to web site developers who want to have granular control on how the files are handled by web browser. The more important thing is that, caching can significantly lower your Amazon S3's monthly bills.--
CrossFTP is a FTP, SFTP, FXP, WebDav, Amazon S3, Amazon Glacier and Google Cloud Storage client for Windows, Mac, and Linux.
CrossFTP Team
http://www.crossftp.com/
Subscribe to:
Posts (Atom)
