Thursday, November 22, 2012

How to use CrossFTP to connect to Google Cloud Storage

To connect to the Google Cloud Storage, please select the Google Cloud Storage in the protocol list box in the CrossFTP's site manager. There ate two different authentication approaches available for the Google Cloud Storage: Access key based and Oauth2 based. We will introduce these two approaches separately in the following:
  • Access key based - you should copy the  access key and the secret from the Google's online management console - Storage - Cloud Storage - Project Dashboard - Interoperable Access (instruction link), and fill on the corresponding field in the site manager, as shown in Fig. 1.
 Fig. 1. Access Key for Google Cloud Storage Protocol
  • Oauth2 based (HTTPS only) - you should fill in the project number and then click to connect, as shown in Fig. 2. If this is the first time you connect to the site, a dialog will be popped up with an authentication URL. You should open this URL in your web browser, and copy the authentication code back into the dialog, as shown in the Fig 3. and Fig.4.
Fig. 2. Input Project Number

Fig. 3.  Authentication Dialog
Fig. 4. Agree the Access Permission, and Copy the Code Back to Authentication Dialog

Once connected, you can create new buckets, modify the file object's permission and metadata, and define the bucket logging on the Google Cloud Storage.

Conclusion

CrossFTP Pro makes it easy to manage Google Cloud Storage sites.
This feature is available for CrossFTP Pro 1.88.2 or later.
--
CrossFTP is a FTP, SFTP, FXP, WebDav, Amazon S3, Amazon Glacier and Google Cloud Storage client for Windows, Mac, and Linux.

Monday, November 19, 2012

CrossFTP 1.88.2 Released

CrossFTP 1.88.2 is a major update. The main changes are:
* Support Google Cloud Storage
* Improved metadata editing tool
* Better support of 3rd party S3 sites API
* Add wizard for Walrus
* Add wizard for DreamObjects

This update is recommended for all CrossFTP users.
--
CrossFTP is a FTP, SFTP, FXP, WebDav, Amazon S3, Amazon Glacier and Google Cloud Storage client for Windows, Mac, and Linux.
CrossFTP Team
http://www.crossftp.com/

Thursday, November 15, 2012

How to Connect to Multiple Sites with CrossFTP

Open New Tab

Connect and manage multiple FTP sites simultaneously are of extreme importance for heavy FTP users. You can easily achieve this in CrossFTP to improve the working efficiency. To do this, simply choose the file pane you want to add a new connection tab, and select Tab -> New Remote Tab to open a new FTP file tab, or select Tab -> New Local Tab to open a new local file system pane. This is shown in the Fig. 1.
Fig. 1. Open New Local/Remote Tab

Site-to-Site/FXP Transfer

If you open a remote site on the left and right pane simultaneously, you can easily do the site to site (FXP) directly by transfer the files from one pane to another pane. Currently we support the traditional FXP transfer, S3 to S3's transfer, and WebDav to WebDav site's transfer in this mode.

Switch between Multiple Tabs

You can switch between different sites simply by click on the corresponding tabs, similar to the modern multi-tabbed web browser. Each tab title shows the site's favorite icon, as well as the folder's name. This is shown in Fig. 2.
Fig.2. Switch between Multi-Tabs

Favorite Bookmarks

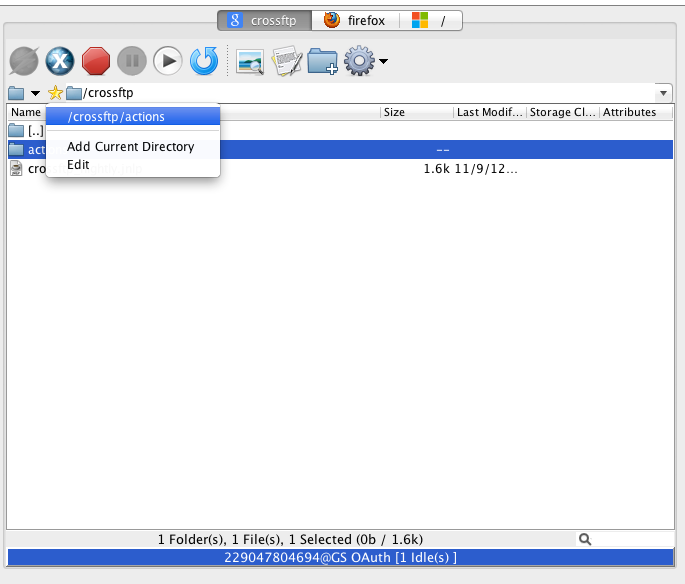
Favorite directory bookmark is another browser-like feature you would want to use when managing many different file locations. This is shown in the Fig. 3.
  • Add New Bookmarks: simply click on the star icon to bookmark, and choose "Add Current Directory" to add a new folder bookmark in the site.
  • Visit the Bookmark: you can access that folder quickly by click on the star icon and select the folder from the popup menu.
  • Visit the browsing history: Click on the drop-down arrow icon and you will see the whole browsing history folders in the popup menu. 
 Fig. 3. Add Favorite Bookamrks

Conclusion

CrossFTP Pro makes it easy to manage multiple sites simultaneously.
This feature is available for CrossFTP Pro 1.86.6 or later.
--
CrossFTP is a FTP, SFTP, FXP, WebDav, Amazon S3, Amazon Glacier and Google Cloud Storage client for Windows, Mac, and Linux.
CrossFTP Team
http://www.crossftp.com/

Sunday, October 28, 2012

Set Default Metadata/HTTP Header for Amazon S3 with CrossFTP

Metadata is widely used in S3 and other cloud storage systems for its storage object's description and HTTP Header's setting.

There are cases that you want to setup the default metadata for all your uploaded objects, e.g, define a common HTTP Header or expire date. To do this, you can choose Site Manager -> S3 -> Enable Default Metadata to allow the setting of the default metadata, and setup the metadata by press the "..." button.
Fig. 1. Default Metadata Setup

You can setup the default metadata in the popup dialog. After press the OK button, the metadata will be saved for future transfers.

When a file is to be transferred to the remote site, CrossFTP will firstly calculate the general metadata for the file, including the file's original modification date, the compression algorithm, the encryption algorithm, mime type, etc. After that, the default metadata will be inserted into the object's metadata table before the transfer. The file transfers together with its metadata info to avoid additional operation cost.

You can check whether the file's metadata has been correctly setup by right click on the file, chose properties, and see the metadata tab.

This feature is available for CrossFTP Pro 1.86.2 or later.
-- 
CrossFTP is a FTP, SFTP, FXP, WebDav, Amazon S3, Amazon Glacier and Google Cloud Storage client for Windows, Mac, and Linux.
CrossFTP Team
http://www.crossftp.com/

How to Sign Private Distribution's URL with CrossFTP

To sign a URL for private distribution's object, you firstly need to setup a private distribution with read permission to your S3 objects. Check this blog for how to properly setup the private distribution.

To create the sign URLs, you can select the files you want to sign, and choose "URL..." from the popup menu. The URL will be shown to assist your URL Sign tasks. Our URL generator dialog can detect whether an S3 object is associated with private Download/Stream distribution, and then assist to create the corresponding HTTP/HTTPS/RTMP/HTML URLs, as shown in Fig. 1.
 Fig. 1. URL Dialog

Before start to sign the URL, defining the secure signing policy's definition is a precondition:

Secure Signing Policy

You can setup the signing policies by choosing Tools -> Policies, or  in the URL dialog and press the Signing policy: Configure button.
The policies list dialog will be shown as Fig. 2. You can use "New" button to create the new policy, "Edit" button to edit an existing policy, "Delete" button to remove a policy, "Save as" and "Load from" button to export/import the policies.

Fig. 2. Policies Dialog
There are two types of signing policies: Canned Policy and Custom Policy. Here we introduce these policies one by one:

Canned Policy: a "simplified" policy definition that uses default options for your signed URL's behaviors, as shown in Fig. 3. Key pair ID and Private Key file are the most importation items in this dialog.

Fig. 3. Canned Policy Modification
  1. Key pair ID is the ID number you will get from Amazon when you generate a Key Pair using Amazon web interface or when you upload your own key.
  2. Private Key File is the file you downloaded from Amazon web interface when you generate a Key Pair, or the private key file you used to generate the Key pair for uploading to Amazon.
Custom Policy: a policy describes custom access permissions to apply via a private distribution's signed URL, as shown in Fig. 4. Compare this with the Canned policy, we can find that two important items are added here: CIDR range and Resource URL.

Fig. 4. Custom Policy Dialog
  1. CIDR range: An optional range of client IP addresses that will be allowed to access the distribution, specified as a CIDR range.
  2. Resource URL: An optional HTTP/S or RTMP resource path that restricts which distribution and S3 objects will be accessible in a signed URL. For standard distributions the resource URL will be "http://distributionName/objectKey" (may also include URL parameters). For distributions with the HTTPS required protocol, the resource URL must start with "https://". RTMP resources do not take the form of a URL, and instead the resource path is nothing but the stream's name. The '*' and '?' characters can be used as a wildcards to allow multi-character or single-character matches respectively.

Generate signed URL for Private Distribution

URL dialog checks the S3 objects' associated distribution, and adds the private distribution's domain name/CNAMEs in the CNAME dropdown box. The URL dialog supports to generate HTTP/HTTPS/RTMP/HTML/FTP/Path type URLs.
For the download distribution, you should choose HTTP/HTTPS radio button, choose the prefixed distribution URL in CNAME drop-down box, select the proper signing policy, and then press "Generate" button to sign the distribution, as shown in Fig. 1.
For the stream distribution, you should choose RTMP/HTML radio button, choose the prefixed distribution URL in CNAME drop-down box, select the proper signing policy, and then press Generate button to sign the distribution, as shown in Fig. 5.
Fig. 5. Sign URL for Stream Distribution

Conclusion

CrossFTP Pro makes it easy to manage your CloudFront distribution and URL signing.
This feature is available for CrossFTP Pro 1.86.2 or later.
--
CrossFTP is a FTP, SFTP, FXP, WebDav, Amazon S3, Amazon Glacier and Google Cloud Storage client for Windows, Mac, and Linux.
CrossFTP Team
http://www.crossftp.com/

Saturday, October 27, 2012

How to Configure Private CloudFront Distribution with CrossFTP

Private CloudFront distribution is a good way to securely distribute the private download/streaming contents with Amazon CloudFront.

CrossFTP fully supports the private CloudFront distribution. To enable Private distribution, you can select a bucket, and right click to choose CloudFront -> Manage CloudFront Distributions..., and you can see a list of existing CloudFront distributions for the bucket, as shown in the Fig. 1.
 Fig. 1. CloudFront List Dialog

Create/Update the Private CloudFront Distribution

You can create a new CloudFront distribution by press the "New" button, or update an existing CloudFront distribution by press the "Edit" button. You can fill in the CloudFront distribution's basic information in the General Tab. 
To enable the private CloudFront distribution, you should choose the "Private Content" tab, and toggle the "Enable Private Distribution" button, as shown in Fig. 2.

 Fig. 2. Enable Private Distribution
There may be a few concepts new for you in this dialog:
  • Original Access Identity: this is a "virtual" user that is used for managing permissions that represents the private CloudFront distribution.
  • S3 Canonical User ID:  Associated with the Origin Access Identity, this is the user ID that you can use in ACL/permission setting dialog to grant permissions for the distribution. If you want to use distribution to share the contents, you need firstly to grant this ID the read permission in ACL/permission setting dialog.
  • Trusted Signers: Only trusted signers are allowed to sign the distribution URL in S3. If you want to sign the private distribution URL for the download/streaming, you should at least add one trust signer, for example, by toggle "Add Myself as a Trusted Signer".
    To find your account number, go to Your Account | Account Activity on AWS website, and look for the Account Number.

Grant the Permission for the Original Access Identity

You have to grant Read access to CloudFront Origin Access Identity account to make the files available for Private Distribution. 
To do this, two approaches are possible:
  • Grant the read permission for the S3 Canonical User ID. Copy the S3 Canonical User ID as shown in Fig. 2., and add that user the read permission for the S3 object by right click on the object, and choose "ACL Setting...", as shown in the Fig. 3.

Fig. 3. Add S3 Canonical User ID with Read Permission 
  • Or you can configure the Bucket Policy to always grant Read access to Origin Access Identity, by right click on the Bucket, and choose "Bucket Policy..." to set up the policy.
This feature is available for CrossFTP Pro 1.86.2 or later.
CrossFTP is a FTP and Amazon S3 client for Windows, Mac, and Linux.

Tuesday, October 23, 2012

Setup Default Permission for File Transfer with CrossFTP

Permission is one of the most important security aspect for the files on the remote site. We pay high attention on this area, and to allow flexible permission control for file transfers, CrossFTP supports four types of permission setting policies for the upload and FXP tasks. You can find the permission setting options in the Site Manager -> Actions-> Default Permission.

 Fig. 1. Default Permission Setup

As shown in the Figure 1, the available options are:
  • No Inheritance: do not setup and arbitery permissions in the transfer process.
  • From Parent: the file's permission will be copied from its parent folder's permission.
  • From Source: the permission will be copied from the FXP transfer's source file.
  • Default Permission: you can specify the default permission at the right side's "..." button. Transfered files will be assigned with this permission. For different FTP protocols, such as FTP (Fig. 2) and S3 (Fig. 3), different UI will be provided for setting the default permission. This is the recommended choice if you don't know which option to choose.

 Fig. 2. Default Permission UI for FTP


 Fig. 3. Default Permission UI for S3

For S3 site, the permission will be assigned during the transfer, so that you don't need to pay for the permission change operation's fee.

This feature is available for CrossFTP 1.81.2 or later.
CrossFTP is a FTP and Amazon S3 client for Windows, Mac, and Linux.

Monday, October 22, 2012

Client Side Encryption Support with CrossFTP

Security is one of the top consideration when choosing FTP/Cloud storage client software and providers. CrossFTP puts security as top priority in its design. For security of FTP/Cloud storage client software, it includes 3 parts: 1,  protect the FTP/Cloud storage sites' password in local configuration; 2,  protect the password and files during the data transfer; 3, protect the files on the remote storage service provider.

In this document, we focus on point 3: how CrossFTP protect the files stored on the remote storage service provider: encrypt the files on local before sending them out.

Client side encryption for Amazon S3, Amazon Glacier, FTP, or WebDav are one important security feature CrossFTP Pro provides to enhance the data transfer security. To further enhance the transfer security, CrossFTP Pro supports client side encryption for for all FTP protocols it can handle, including FTP, SFTP, FTPS, WebDAV, Amazon S3, etc. After enable the client side encryption, in the upload process, all files will be firstly encrypted before they are transferred to the remote site.  In the download process, the encrypted file will be decrypted after the file is downloaded from the remote site to the local drive. We will add ".aes" extension to the encrypted files to stand for the encryption.

We uses one of the strongest block ciphers available, 256-bit Advanced Encryption Standard (AES-256), for the encryption. 256-bit is the largest key size defined for AES.

To enable the client side encryption, you can choose Site Manager -> Security -> Enable Local Encryption, and input the password for the encryption, as shown in the figure. The password is encrypted stored in the site bookmarks file to ensure the security.


TIP: On a default JRE/JDK installation, AES is limited to 128-bit key size. Hence you will see AES-256 encryption failed with empty files. This is a remnant of import/export laws on cryptographic algorithm. To unlock larger AES key sizes, you need to download and apply the "JCE Unlimited Strength Jurisdiction Policy Files" (for latest JRE/JDK see at the bottom of this page).
Attention: You must make sure you enter the password correctly and remember the password.  Otherwise, you cannot recover the encrypted files if you lost the configuration.

This feature is available for CrossFTP 1.86.2 or later.
CrossFTP is a FTP and Amazon S3 client for Windows, Mac, and Linux. 

Sunday, October 21, 2012

CrossFTP 1.86.2 Released

CrossFTP 1.86.2 is a major update. The main changes are:
* Adds sign URL support for S3 private distribution.
* Adds local encryption support for file transfer.
* Support enqueue the file delete operation for multi-thread processing.
* Adds Mac Mountain Lion and sandbox's support.
* Adds zebra line color to match Mountain Lion's finder style.
* Better compatbility for s3 compatible protocol, such as Ceph, etc.
* Solve FTP PASV/PORT firewall issue in Windows Vista/7/2008 with JDK 7 by fallback IPV4 network stack.
* Fix the private CloudFront update bug.
* Improved file context menu for easier understanding.

This update is recommended for all CrossFTP users.

CrossFTP Team
http://www.crossftp.com/

Saturday, July 28, 2012

CrossFTP 1.81.4 Released

CrossFTP 1.81.4 is a bug fix update.

* Fix the multi-part upload's minimum part size issue.
* Fix the stream CloudFront distribution's delete issue.
* Fix the rtmp URL prefix error.

This update is recommended for all CrossFTP users.

CrossFTP Team
http://www.crossftp.com/

Friday, July 20, 2012

Amason S3 Multi-Part Upload with CrossFTP

CrossFTP supports the multi-part upload for Amazon S3. With Amazon S3's multi-part upload, you can achieve:
  • You can upload larger file over 5G limit.
  • You can make the upload more reliable, by separate the file into multiple parts, and retry only the failure part.
  • You can fasten the upload speed by transfer the multiple parts simultaneously.
To work with the S3 multi-part upload, you need to setup the file's part size by Tools -> Global Options -> S3 -> Multi-part upload part size.
Note: If you meet some issue like the upload file is divided into too many parts, it is probably that the multi-part upload's part size is set too small. You need to set it up as a correct value.

Everything of multi-part upload happens automatically. The main upload file will be divided into multiple parts, and can transferred as separated part items simultaneously.

When all the child parts are uploaded, the main upload file will complete the multi-part upload.

This feature is available for CrossFTP 1.80 or later.
--
CrossFTP is a FTP, SFTP, FXP, WebDav, Amazon S3, Amazon Glacier and Google Cloud Storage client for Windows, Mac, and Linux.
CrossFTP Team
http://www.crossftp.com/

Saturday, June 02, 2012

CrossFTP 1.80c Released


CrossFTP is an excellent FTP client. CrossFTP Pro is a FTP client supporting SFTP, FXP, WebDav, and Amazon S3. CrossFTP 1.80c is a major update of CrossFTP. It significantly enhances the Amazon S3 upload, improves the WevDav compatiblity, and fixes a number of bugs. Here are the main change points:


 * Support S3 multi-upload for large files' uploads.
 * Set the default permission for upload.
 * Set the default S3 metadata for S3 sites.
 * Improve the WebDAV comparability by allowing to send "100-Continue" HTTP Header for server.
 * Fix the URL creation bug for the CloudFront distributions.
 * Fix the permission inheritance from parent's bug.
 * Fix the permission inheritance from source's bug.


This update is recommended for all CrossFTP users.


CrossFTP Team
http://www.crossftp.com/

Saturday, February 12, 2011

How to Customize Columns in CrossFTP

CrossFTP now supports the columns customization, so that the users can choose to customize their preferred columns in the main panel. For the local panel, the available columns include Name, Size, File Type, and Last Modified. For the remote panel, the available columns include Name, Size, File Type, Last Modified, Owner, Group, Storage Class, and Attributes.

To customize the default columns display in CrossFTP, simply right click on the column head, and select the columns you want to see. This is shown in the Figure 1.
Fig. 1, Columns Adjustment

After the adjustment, you can see the updated columns immediately. For example, you can see the S3's storage class when you select the Storage Class column in the customization. This is shown in Figure 2:

Fig. 2 Main Panel after the Columns Adjustment

Now you should be able to find and adjust the columns in CrossFTP as you needed. Let us know if you have any suggestions. This feature is available in CrossFTP 1.75a or later.

CrossFTP Download: http://www.crossftp.com/download.htm

Wednesday, February 09, 2011

CrossFTP Version 1.75a Released

CrossFTP 1.75a is a major update of CrossFTP. It significantly enhances
the user interface, fixes the stabilty issue, improves the sync function,
and lot of other stuffs.
Here are the main change points:
  * Add "Group", "Owner", and "Storage Class" columns' support.
  * Support DevPay for Amazon S3.
  * Fix WebDav error for Air Shairing.
  * Fix the stability issue introduced in 1.70.
  * Improves the main panel UI.
  * Support the keep date option during transfer.
  * Enhance the directory sync for MD5 and date check.
  * Compatible with JDK 1.5 for Mac OS X 10.4 users.
  * A lot of bug fixes.
The update is recommended for all CrossFTP users.

Monday, December 06, 2010

CrossFTP Version 1.70a Released

CrossFTP 1.70a is a major update of CrossFTP. It enhances Amazon S3
functionality, URL generator, and improves the compatiblity with Mac OS X.
Here are the main change points:
  * Support of Bucket Policy.
  * Improved CloudFront Distrubtion Management.
  * Better support of the private streaming distribution.
  * Redesigned URL generation dialog to simplify your work.
  * Kernal update to support Google Storage.
  * Improved Mac OS X compatability.
  * Lots of bug fixes.
The update is recommended for all CrossFTP users.

CrossFTP Download: http://www.crossftp.com/download.htm

Sunday, June 20, 2010

CrossFTP Version 1.65a Released

CrossFTP 1.65a is a major update of CrossFTP. It starts to support portable configuration, and significantly enhances Amazon S3 functionality. Here are the main change points:
  * Portable Configuration. Bring CrossFTP on USB drive.
  * Improved Amazon S3 Distribution Icon.
  * S3 reduced redundancy class support.
  * HTTPS only CloudFront Distribution support.
  * Private distribution support  (download and streaming).
  * A number of bug fixes.
The update is recommended for all CrossFTP users.

Monday, May 10, 2010

CrossFTP Version 1.59a Released

This version is a major update of CrossFTP. It significantly improves the Amazon S3 support, enhances the startup display options, introduces color label for sites, and includes lots of bug fixes. A brief change log is available here:
 * Improved Amazon S3 ACL setting.
 * S3 external bucket support.
 * Amazon S3 streaming distribution.
 * Amazon S3 bucket log and ACL configuration.
 * New S3 Singapore location.
 * Mini mode and toolbar/menu-bar display options.
 * Color category support for different sites.
 * Option to prevent queue restore dialog's display on startup.
 * Table header's UI enhancement.
 * Lots of bug fixes.
Upgrade is strongly recommended for previous CrossFTP versions.

Sunday, November 22, 2009

Thanksgiving Promotion for CrossFTP

Thanksgiving is coming, and we are providing 50% off promotion for CrossFTP Pro's license. The promotion is available from now to the end of Nov. Get a license for CrossFTP now at our buy page and enjoy it!
Thanks for using our product. Let us know if you have any suggestions or comments.

Tuesday, November 17, 2009

How to Synchronzie Folders in CrossFTP

Synchronization and Backup are two common tasks for FTP and cloud storage users. You are allowed to do synchronization and backups for any two folders on Amazon S3, WebDav, FTP, iDisk, or your own computer in CrossFTP Pro. To do the synchronization, simply choose Tools -> Synchronize Directories... The synchronization dialog will be displayed as follows:


The left and right top edit box shows the two folders you are trying to synchronize on. A number of options are provided in this Synchronization Dialog.

What to Sync

Describe the content that will be synchronized/backup.
  • Include, exclude - the patterns for you to include or exclude in the synchronization. It is a comma-separated list of patterns of files that must be included/excluded. When both inclusion and exclusion are used, only files/directories that match at least one of the include patterns and don't match any of the exclude patterns are used. If no include pattern is given, all files are assumed to match the include pattern (with the possible exception of the default excludes). The default excludes are empty in CrossFTP. The definition of the patterns can be found here.
  • Include Sub Directories - whether sub directories should be included for the synchronization.
  • Follow Symbolic Link - whether the symbolic link should be followed or just treated as a normal file. If symbolic link needs to be followed, linked file/directory will be retrieved. 

How to Sync

Describe the way how the comparison should be made for two directories' synchronization.
  • Mirror Left to Right - Treat the Left side directory as the basis, and copy every files from left to right. If a file with the same name appeared simultaneously on the left and right, and two files are checked as different, the right side file will be overwritten. If a file appears only on right, you can choose to keep it, or by choosing "Delete Unnecessary Files" to delete it.
  • Ignore Date - If it is checked, CrossFTP does not compare the file's last modified date, and treat them as the same if they have the same size. If it is not checked, two files with same size are treated as different if they have the last modified date differ larger than a given threshold. If your server has a different time zone with your client machine, you can setup the difference between your server and your machine at Site Manger -> Actions.
  • Delete Unnecesary Files - In the Mirror Left to Right mode, if a file appears only on right, the right side file will be overwrited if this option is selected. Otherwise, no action will be performed on the right side file.
  • Case Sensitive - whether the file name's comparison are case sensitive.
Preview your Synchronization/Backup Result

  • Preview - Preview the synchronization result. It will retrieve all the matching files from the synchronization directories, compare the files, and then list the comparison result on the synchronization table below. 
  • Stop - Stop the Preview.
  • Help - Get help information of synchronization.
Filters

Filters options help you to refine the synchronization results by a number of directions and criteria. Only filtered results will be appeared in the final synchronization process.
  • Right Direction - Keep or filter all the items that need to copy towards right side.
  • Left Direction - Keep or filter all the items that need to copy towards left side.
  • Equal - Keep or filter all the items that left and right sides are treated as equal.
  • Unequal - Keep or filter all the items that left and right side are treated as unequal.
  • Last Modified in - You can define the number and interval (days, hours, minutes) that the file's last modified time should be within. If selected, only items that meets the last modified condition are appeared in the result set.
Synchronization Actions

These buttons help you to add the previewed sync content to the queue, or save the current synchronization tasks in the queue.
  • Synchronize - Put the previewed result set in the queue and close the synchornization dialog.
  • Queue Settings - Save the what, how, and filters setting in the queue as one queued synchronization item. You can start the queue to process this synchroniztion item by the queue processing engine, shedule this sycn item for future processing, save/load this queue, or modified the sycn item in the synchorniztion dialog. After press this button, the synchornization item will be added in the current queue. If you edit a sycnchronization item in the queue, this Synchronization Dialog will be displayed for modification, and this button's text will be shown as Save.
  • Close - Close the synchronization dialog and do nothing. 
Schedule or Save the Synchronization/Backup Task


You can schedule all the tasks in the queue. Since you can queue the synchronization task in the queue (use Queue Settings button), you can simply schedule the queued sync item (Queue -> Advanced -> Schedule...), or save this queue for future usage (Queue -> Manage Queue -> Save Queue...).

Example

Here we will show an example for you to understand our synchronization/backup process. If you want to backup local machine's forum => remote Amazon S3's forumOld, you can go to local machine's folder in the left pane, remote Amazon S3's folder in the right pane, and choose Tools -> Synchronize Directories... After that, left (source) and right (target) folder's edit box will be automatically filled in with the folders mentioned before. After that, you should choose "include sub directories" and "Mirror Left to Right" options, and then press Preview button. All the results will be displayed in the table below after calculation is made. Finally you can press Synchronize button to add the Sync results in the queue, or if you are satisfied with the setting, use Queue Settings button to store this sync dialog's setting in the queue, so that you can schedule/edit this setting in future. You can also check this link for a screencast.


Conclusion

With the powerful synchronization and backup engine provided in CrossFTP Pro, it is a nice synchronization tool available for your FTP, FXP, WebDav, iDisk, and Amazon S3. Meanwhile it works well on Windows, Mac, and Linux. We hope you will find our post useful and enjoy the easiness of CrossFTP Pro. As always we appreciate your feedback as it helps to make the product better!

Tuesday, November 10, 2009

How to use CrossFTP as an Excellent WebDAV Client?

WebDav is a collaborative file management protocol being widely used in a lot of cloud storage and content management systems, such as SharePoint, Alfresco, etc. It extends the HTTP protocol to make the Web a readable and writable medium, and it has much better firewall/router compatibility than the traditional FTP protocols. CrossFTP Pro is an excellent WebDav client with excellent reliability and performance, and it offers a lot of value-added services than the operating system's bulid-in clients.

In the following we will show how to connect to the WebDav site in CrossFTP, and some unique features available in the CrossFTP.

 
To get a WebDav account:

  1. Normally your WebDav service provider will give you the account information.
  2. If you have not got a WebDav account yet, you may register a traditional host provider (such as bluehost), or you can create a WebDav server on your own machine (such as Apache HTTP server with WebDav mod).
  3. After successful registration/creation of your WebDav account, you will get your WebDav server's host, port, user name, and password.
To connect to a WebDav account:
  1. Create a new site in CrossFTP, and choose the Protocol field as WebDav (default port is 80) or WebDav/HTTPS (default port is 443). After that, fill in the Host filed with your server's host, and Port field with your server's port.
  2. Enter your User Name field with user name, and Password field with password information, and press Connect to connect to the FTP Server.
  3. Setup your site's web URL (optional). If you want to preview your web pages, or copy the page's URL address, you can fill in the Remote Path field with your site page files' root path on your server (e.g., /public_html), and the Web URL field with your site's root URL (e.g., http://www.crossftp.com/). After that, you will be able to copy the page's URL, or preview the pages in your favorite web browser.
WebDav Connection


WebDav's Value-Added Services available in CrossFTP
  • Lock and Unlock - Used to put or remove a lock on the resource. WebDav server normally supports both shared and exclusive locks. You can choose the Lock, Unlock, or Show Locks in the CrossFTP Pro file panel's context menu.
  • WebDav FXP Copy - To copy directly on WebDav server without going through local computer, you can open the source and target WebDav locations on left and right panels, and do the copy. Your server needs to support WebDav copy API to allow this to work.
  • Schedule the Queued Item - Batch transfer your data in the queue, and schedule the transfer task. You can choose the schedule option in the Queue's context menu -> Advanced -> Schedule.
  • Synchronization - Synchronize the folders for your WebDav servers. You can choose it at Tools -> Synchronize Directories...
  • Remote Edit - Edit your remote WebDav files directly.
  • and much more, such as WebDav-to-WebDav copy, move to, rename, certification management, and more..

Conclusion

With the reliability and performance provided in CrossFTP, it is recognized as the top WebDav client tool available on the market. In addition, CrossFTP also supports the SFTP, FXP, and Amazon S3 protocols, and it works well on Windows, Mac, and Linux. We hope you will find our post useful and enjoy the easiness of CrossFTP. As always we appreciate your feedback as it helps to make the product better!
--
CrossFTP is a FTP, SFTP, FXP, WebDav, Amazon S3, Amazon Glacier and Google Cloud Storage client for Windows, Mac, and Linux.
CrossFTP Team
http://www.crossftp.com/

Tuesday, November 03, 2009

How to setup custom metadata or http headers for Amazon S3 objects in CrossFTP?

If you are using Amazon S3 to serve your files over http, you will get an additional flexibility to custom http headers could provide.  For instance if you properly set Cache-Control http header, it will help you to reduce your Amazon S3 bills.
You can set up http-headers for the files already located in S3 buckets. Just select the file you want to set headers for and right click it. Choose Properties... from the context menu, and you will see the Metadata table in the Advanced tab


The content of the metadata Table shows the headers metadata that are already assigned to the file. Most of them are assigned by Amazon S3 by default.

If you want to add a custom http header metadata, just click + button and type a name/value pair for the header.
 Click ok and the new header will appear in the Metadata Table. Click Commit, and the header will be applied to the file on S3. Next time someone requests this file from the web browser, the new http header will take effect. 

Can I set headers for multiple files at once?

Yes. Just multi-select the files that you want to set headers for and follow the instructions above. If you want to apply for the subfolders as well, toggle the option "Apply changes to subfolders".

Commonly Used HTTP Headers for Cache:


  • Expires:
      Key: "Expires" 
      Value: HTTP-date
An example of its use is
Expires: Thu, 01 Dec 1994 16:00:00 GMT
Note: if a response includes a Cache-Control field with the max-
      age directive (see section 14.9.3), that directive overrides the
      Expires field.
  • Cache-Control:
    Key: "Cache-Control" 
    Value: cache-directive
cache-directive = cache-request-directive
         | cache-response-directive
cache-request-directive =
           "no-cache"                          ; Section 14.9.1
         | "no-store"                          ; Section 14.9.2
         | "max-age" "=" delta-seconds         ; Section 14.9.3, 14.9.4
         | "max-stale" [ "=" delta-seconds ]   ; Section 14.9.3
         | "min-fresh" "=" delta-seconds       ; Section 14.9.3
         | "no-transform"                      ; Section 14.9.5
         | "only-if-cached"                    ; Section 14.9.4
         | cache-extension                     ; Section 14.9.6
cache-response-directive =
           "public"                               ; Section 14.9.1
         | "private" [ "=" <"> 1#field-name <"> ] ; Section 14.9.1
         | "no-cache" [ "=" <"> 1#field-name <"> ]; Section 14.9.1
         | "no-store"                             ; Section 14.9.2
         | "no-transform"                         ; Section 14.9.5
         | "must-revalidate"                      ; Section 14.9.4
         | "proxy-revalidate"                     ; Section 14.9.4
         | "max-age" "=" delta-seconds            ; Section 14.9.3
         | "s-maxage" "=" delta-seconds           ; Section 14.9.3
         | cache-extension                        ; Section 14.9.6
cache-extension = token [ "=" ( token | quoted-string ) ]

Conclusion

With the ability to set custom http headers CrossFTP Pro is becoming a compelling tool for Amazon S3 users, in particular to web site developers who want to have granular control on how the files are handled by web browser. The more important thing is that, caching can significantly lower your Amazon S3's monthly bills.
--
CrossFTP is a FTP, SFTP, FXP, WebDav, Amazon S3, Amazon Glacier and Google Cloud Storage client for Windows, Mac, and Linux.
CrossFTP Team
http://www.crossftp.com/

Monday, October 26, 2009

CrossFTP 1.55a Released

CrossFTP is an excellent FTP client. CrossFTP Pro is a FTP client supporting SFTP, FXP, WebDav, Sun Cloud Storage and Amazon S3.

CrossFTP 1.55a is a major update, which includes:
* Significantly enhances Amazon S3 support with Metadata modification, gzip transfer compression, logging, MIME types modification, etc.
* Improves the compatibility for Snow Leopard and Windows 7
* Adds the OS/2,Netware, glFTPd ansi-color, etc., listing support, and SFTP/SSH's command and archiving support
* Introduces ident-server protocol support
* Adds checksum support in the property dialog
* Provides a lot of bug fixes
This is a free update, and is recommended for all CrossFTP Users.

Sunday, October 11, 2009

How to Make Huge Batch Transfers in CrossFTP?

In the could computing era, you may need to transfer huge amount of data from one data center to another. No matter this is on an Amazon S3 cloud platform, or a traditional FTP platform, you need a reliable tool to save your headaches. Here we will show you some guides on how to address the huge batch transfers problems in the CrossFTP to save your life.

1. Add the transfer to the queue. When a huge number of files are selected in the source panel, you will experience problems if you want to Drag & Drop the files to the target. This is due to that the the Drag & Drop goes through the system's clipboard, which has a size limitation. To deal with this problem, you can open the context menu, and choose Transfer/Copy or Queue from this menu. This will directly add the files in the CrossFTP's task queue without going through the system's clipboard. You can see the following figure for the clarification. Meanwhile, you may improve the stability by disabling the directory pane's bundling (which updates the bundled directory pane's content according to the current transfer) by Tools -> Global Options -> Transfer -> Bundle Directory Content during Transfer.


2. Address the memory limit if there is a one (Optional). The CrossFTP program's default maximum heap memory limit is 512Mb. If your transfer queue is so big that the CrossFTP has no enough heap memory for the allocated queue, you can try to increase this memory limit by adding the startup memory flag in CrossFTP's execution script. Windows XP has 2G memory limit; 32-bit systems (Mac OS X, Linux, or Solaris) have maximum 4G limit, while 64bits systems have much higher maximum limit. The command to setup the heap size in Java virtual machine is -Xms (for the initial heap size) and  -Xmx (for the maximum heap size). For example, the following line in the execution script setups CrossFTP to use 128m as initial heap size, and 512m as maxium heap size:
java -Xms128m -Xmx512m ...crossftp_other_startups...


3. Error recovery.  All your transfer history can be found in the Logs -> Transfer history. You can check that to see if there is anything wrong with the batch transfer. Meanwhile, if CrossFTP crashes during a long time batch transfer, you can always recover the transfer when the CrossFTP restart. Just choose the Recovery Mode on the Queue Restore Dialog, and your crashed queue file can be found and reloaded in this mode.


We hope you will find our post useful and will enjoy the easiness of CrossFTP Pro. As always we appreciate your feedback as it helps to make the product better!

Sunday, September 27, 2009

What has kept us Being Busy in CrossFTP

There has been for a short period of silence on this web site. During this period, we are busy improving our CrossFTP client. Here highlights a few major improvements we are under going:

 Enhanced Amazon S3 Support
  • The S3 head metadata's modification support. You can easily modify and add metadata on one or multiple files stored on S3 site. For example, you can add cache-control header like "max-age" or "expires" with a time value for your S3 files. This will help you to specify the browser cache's living time, and save your cost.


  • Data compression for S3 file transfers. GZip based data compression is now supported by CrossFTP Pro. Just choose Site Manger -> Options -> Data Compression. After that, all files upoads for this site will be automatically compressed. In the log window, you should be able to find the messages like "GZip Compressed". The download process will automatically uncompress the files on the fly. Need to mention that, we also support FTP and SFTP protocol's data compression by toggling this option. That is, if your chosen protocol is FTP, compression will be made by Mode Z on the fly, and if your chosen protocol is SFTP/SSH, the compression will be made by zlib on the fly. To save your bandwidth and cost, you can try this easy and powerful option.
  • Log configurations for the buckets and CloudFront Distribution. Now we have provided those Amazon S3's logging configuration GUI. We think you will like it.
  • Data encryption. Security is an important issue when you put your data on the cloud. This support in CrossFTP Pro is still under working to figure out what is the best way.
  • Various bug fixes. We use the virtual directory simulation to simulate the folder structures for your S3 files. Separator character "/" in your s3 object's key is treated as a folder symbol. Some of your folders may not have such placeholders objects (due to your files are created by some other tools, etc.), we will ask you whether you want to add the placeholder objects to your S3 site. If the answer is yes, we will help to fix the virtual directory problem.
Enhanced SFTP/SSH Command Support
  • Execute your command directly on your SFTP/SSH site. SSH protocol allows you to login and execute command on your remote site. Now CrossFTP Pro directly supports such command execution. It works similar with the FTP's command execution. Check Manage FTP Sites by FTP commands.
  • Remote Archive/Extraction support. If you wants to upload/download a lot of small files, the best way to save your time is to archive them before the transfer and extract them after the transfer. The problem is that the remote site cannot archive/extract your zip files. No, this is not a problem anymore. Now it is supported in CrossFTP Pro for SFTP protocol. You should have a try and save your time for transferring.
More FTP Listing Format Support

Here are the list of format we supported in the previous versions:

  • Unix ls (ProFTPd, Wu-FTPd, Microsoft FTP and many others)
  • DOS (Microsoft FTP and others)
  • VMS and MultiNet (both single and multiline)
We now added the following list format support:

  • OS/2
  • OS/400
  • Netware
  • Connect:Enterprise Unix
  • glFTPd ansi-colored list
  • support for custom list parsers
Misc Enhancements
  • Improved Snow Leopard and Windows 7 support. This few months are busy days for the operating system. We will keep our software good on that.
  • Ident-server protocol support. This is an ancient protocol, but when you need it, you should be able to use it. Now this is added in CrossFTP Pro.
  • Checksum for MD5, SHA-1, SHA-256, SHA-384, SHA-512, and CRC32 are supported.
  • And a lot of various bug fixes!
CrossFTP 1.55a is a major update and will be released soon, which includes most of the above enhancement. This is a free update, and is recommended for all CrossFTP Users.

Tuesday, July 14, 2009

CrossFTP 1.53b Released

CrossFTP is an excellent FTP client. CrossFTP Pro is a FTP client supporting SFTP, FXP, WebDav, Sun Cloud Storage and Amazon S3.

CrossFTP 1.53b adds new Spanish and Netherlands translation, and fixes a number of bugs.

Thursday, June 18, 2009

CrossFTP 1.53 Released

CrossFTP is an excellent FTP client. CrossFTP Pro is a FTP client supporting SFTP, FXP, WebDav, Sun Cloud Storage and Amazon S3.

CrossFTP 1.53 is a major enhancement version. This version
provides the Sun Cloud Storage preview support, significantly improves the reliability and performance for the huge bulk transfer, adds the reveal in file manager function, and fixes a number of bugs.

Friday, May 29, 2009

CrossFTP Software will be on exhibition at JavaOne Conference

As a partner of Sun Cloud Storage project, CrossFTP will participate the exhibition at JavaOne Conference in San Francisco. We are proud to provide the new service technologies for cloud storage, and to show how CrossFTP can help you. Our exhibition time is Jun 1st and Jun 2nd.
Here is JavaOne Conference Info Site for your reference.

Update: We have a nice experience at JavaOne, and met peoples who are interested in the Cloud Computing era. Here we attach the picture of our booth at the JavaOne.

Tuesday, April 28, 2009

CrossFTP 1.52 Released

CrossFTP is an excellent FTP client. CrossFTP Pro is a FTP client supporting SFTP, FXP, WebDav, and Amazon S3.

CrossFTP 1.52 is a major enhancement version. This version adds WebDav lock/unlock function, improves the FXP transfer, speed updates, and fixes a number of bugs.

Tuesday, March 31, 2009

CrossFTP Pro and Amazon CloudFront Distribution

Amazon recently announced CloudFront service, its version of reliable and cost efficient Content Delivery Network that is seamlessly integrated with Amazon S3. It makes it easier for you to distribute content to end users quickly, with low latency and high data transfer speeds. Amazon CloudFront delivers your content through a worldwide network of edge locations. End users are routed to the nearest edge location, so content is delivered with the best possible performance.

To create CloudFront Distribution in CrossFTP Pro, you have to select one Bucket, or inside one Bucket, and choose Manage CloudFront Distributions in the context menu, as shown in the following figure.


A new List Distribution dialog will be shown. You can create new Distributions, or Edit the existing ones in this dialog. A Distribution dialog will be popped up if you create or edit a distribution. In this new dialog, you should Enable the Amazon Distribution, and optionally fill in the comments as well as a list of CNAMEs. Once you've made the modification, click OK to take effect, and the List Distribution dialog will be refreshed accordingly. Keep in mind that Status field will be “In Progress” while Amazon copies your files to the edge servers and turn to “Deployed” when done.


You can temporarily disable a distribution by clearing out “Enable Amazon CloudFront Distribution” checkbox. To delete a distribution, you need to disable the distribution first, and then select delete to remove the distribution.

We hope you will find our post useful and will enjoy the easiness of CrossFTP Pro. As always we appreciate your feedback as it helps to make the product better!

CrossFTP and Amazon S3 Service

Amazon Simple Storage Service (S3) is an online on-demand data storage service offered by Amazon Web Services. Amazon's S3 provides a simple web server to access any file that is stored in their storage cloud. This means, you can access files stored at S3, or directly via a web browser, if you have set the permissions as "read" for all users.

To get an Amazon S3 account:
  1. Open page sign up for amazon s3 and locate a Sign Up button towards right side of this page. Click the button and follow instructions.
  2. After success registration, you will find Access key and Secret key at Your Account -> Security Credentials. Your access key is visible but your secret key, which serves as a password, is hidden within "show" label. You need these two keys to start working with Amazon S3 Services. 
To Connect to Amazon S3 in CrossFTP:
  1. Create a new site in CrossFTP, and choose Protocol as S3/HTTPS
  2. Fill in the Access Key and Secret field. Press connect to connect to the S3 site. Your Access key and Secret key can also be found at this page.
  3. [opt-in region only] Regional endpoint should be used for opt-in S3 regions for the Host field. See S3 endpoint table (link) for the regional endpoint for details.

How to Create Bucket in CrossFTP?
Bucket
: Each of the files and folders stored in Amazon S3 is contained in a bucket. It's like "top level folder" or "top level drive". Bucket names are globally unique. If you want to use these buckets for web hosting, try to choose a bucket name, which is a valid host name and everything should be lower case:

Valid Name : bucket2008, 1bucket, 01_bucket, 01.bucket, www.example.com
Invalid Name :_bucket, .bucket, -bucket, 01-.bucket,01.-bucket, 127.0.0.1

To create a bucket in CrossFTP, just go to the root folder \, and choose Create a new Folder. You will be allowed to choose whether your bucket's location is in US or EU, which means to a unites state's bucket, or Europe's bucket. Press OK to finish the bucket creation.

How to transfer files from/to Amazon S3?
Just like the traditional FTP file transfer, you can just Drag & Drop the files from/to your S3 site. Multiple tabs, multiple threads, queue modifications, directory synchronizations, etc are naturally supported for the S3 transfer as well.

How to grant proper ACL for IAM account to list buckets and files

Here is a sample ACL setting for IAM account's AWS managed policies:

{
    "Version": "2012-10-17",
    "Statement": [
        {
            "Effect": "Allow",
            "Principal": {
                "AWS": "iam-user-arn"
            },
            "Action": [
                "s3:PutObject",
                "s3:GetObject",
                "s3:GetObjectVersion",
                "s3:ListBucket"
            ],
            "Resource": "bucket-arn"
        }
    ]
}

Backup files in Glacier/Deep Archive Storage

To make cost effective backup and restore of files through Glacier/Deep Archive storage, check this page.

Conclusion

We hope you will find our post useful and will enjoy the easiness of CrossFTP Pro. As always we appreciate your feedback as it helps to make the product better!

Saturday, March 28, 2009

Edit Remote Files in CrossFTP

Edit the files in the remote FTP site can be as simple as one click in CrossFTP. You can press the edit button, or shortcut F3 to edit the selected file, as shown in the above figure. You can also modify your preferred editor to meet your requirement. Just choose Tools -> Global Options -> Operations, as shown in the above figure.

If you want to open certain types of files with specific editor, for example, htm file by dreamweaver, and txt file by notebook, you can further specify the openning program for each type of file. To do this, just choose your file, open the context menu in the file pane, and select Edit/Open with -> Choose Program. After setting up your preferred program, you can reuse it in future.

We hope you will find our post useful and will enjoy the easiness of CrossFTP Pro. As always we appreciate your feedback as it helps to make the product better!

Monday, March 23, 2009

CrossFTP 1.51 Released

CrossFTP is an excellent FTP client. CrossFTP Pro is a FTP client supporting SFTP, FXP, WebDav, and Amazon S3.

CrossFTP 1.51 is a major enhancement release. It starts to support FTP Web URL and preview in browser, advanced log management utility, Web CrossFTP Pro's customization, archive files and directories, Amazon CloudFront distribution management, S3 signed URL, S3 object head display. It also fixes a lot of known issues in the FXP transfer, SFTP link file support, and further improves the stability of the file transfer engine.

Home page: http://www.crossftp.com

CrossFTP Server 1.12 Released

CrossFTP Server is a user-friendly, professional FTP Server for multiple platforms. It offers a high-performance, easy configurable, and most of all a secure enabled FTP server. It provides a versatile GUI for the novice users' start-up, and the advanced users' configuration as well.

CrossFTP Server 1.12 is a bug fixes release. It fixes the configure dialog's display problem, and the tray icon suspension in the Mac OS X system.

Home page: http://www.crossftp.com/crossftpserver.htm

Friday, March 20, 2009

Fast filter and search the file in list


Search and find a file in the file list is a common task for heavy FTP users. Sometimes when you need to fastly locate the file, it is often a headache for your eye. However, CrossFTP makes this very simple. It provides a fast way to do this by using a filter box in the right bottom corner. You can also press / on your keyboard to go to this fast filter box. Take the above Figure as an example, by filling in the file name in the filter box, the Linux's kernel files are dynamically filtered and displayed in the directory pane.

We hope you will find our post useful and will enjoy the easiness of CrossFTP Pro. As always we appreciate your feedback as it helps to make the product better!

Friday, March 13, 2009

Manage FTP sites by FTP command


FTP commands provide a useful way to manage your FTP site remotely. Some FTP servers support a rich set of FTP commands to manage the users, groups, quotas, and so on.

CrossFTP Pro offers powerful command line tool to easily manage your multiple FTP servers. To open the command line tool, choose View -> Command Line, and you will see the command line tool to appear below the FTP files panel. To submit a command to the FTP server, just enter your command, and presee ENTER.

CrossFTP Pro predefines a number of FTP commands for several famous FTP servers. The predefined command set in CrossFTP Pro contains glFTPd, glFTPd admin, RaidenFTPD, ioFTPD, Serv-U and DrFTPD. They are defined in the file ~/.crossftp/ftpcmd.xml (on windows is C:\Documents and Settings\username\.crossftp\ftpcmd.xml). You can also modify this configuration file to add your preferred command set.

CrossFTP Pro also support to manage a number of FTP sites simultaneously. You should already know that CrossFTP is a multi-tabbed FTP client. If you have a list of similar FTP sites, and have already opened them in the CrossFTP's tabs, you can submit the FTP command to these sites simultaneously without reentering the command many times. To do this, just choose "Sumbit to All Tabs" in the popup menu, as shown in the picture, and then input the command and press ENTER. That's it, very easy, right?

Any commands or suggestions on the command tools are welcome!

Monday, March 09, 2009

How to change the files' default Mime types for Amazon S3 in CrossFTP?

Each file in Amazon S3 is associated with Mime types. The file's mime type will be sent to the client when the file is downloaded. The mime type is important for the end users since normally the client will decide how to process the file according to its mime type.

The good news is that, it is relatively simple to change the files' default mime types for Amazon S3 in CrossFTP client. You can use any of your favorite text editor, and edit the file named mime.types to change it, which contains all files' default mime information in CrossFTP. You can find the mime.types file at:
  • In windows: (if you install your windows in c drive) C:/Documents and Settings/USER_NAME/.crossftp/mime.types, where USER_NAME is your system's login name.
  • In *nix: ~/.crossftp/mime.types
After modifying the mime.types, restart CrossFTP, and all the changes will take effect.

We hope you will find our post useful and will enjoy the easiness of CrossFTP Pro. As always we appreciate your feedback as it helps to make the product better!
Monday, December 22, 2008

CrossFTP 1.50 Released

CrossFTP is an excellent FTP client. CrossFTP Pro is a FTP client supporting SFTP, FXP, WebDav, and Amazon S3.

CrossFTP 1.50 changes to a new vivid icon theme, adds a new default system file icon set, improves the Drag & Drop behavior, and fixes a lot of bugs.

Monday, November 17, 2008

CrossFTP 1.42 Released

CrossFTP is an excellent FTP client. CrossFTP Pro is a secure FTP/FXP/SFTP/WebDav/S3 client and synchronization tool.

CrossFTP 1.42 is a major enhancement release. It improves the user interface, fixes a number of bugs, and adds new Amazon S3 support in CrossFTP Pro.